Overview
Why Use Webhooks
When building integrations between applications, we may want our application to receive ongoing events so that our backend system can take appropriate actions.
To enable webhook events, we need to register a webhook endpoint. Once registered, the application can push real-time event data to our webhook endpoint. Lexupay uses HTTPS to send webhook events to our application as a JSON payload that includes the event object.
Receiving webhook events is very useful for listening to asynchronous events such as when a customer's bank confirms a payment, a customer disputes a charge, a recurring payment succeeds, or when collecting subscription payments.
Event Overview
Lexupay generates event data that can be sent to us to notify activities in your account.
When events occur, Lexupay creates a new event object. One API request can result in the creation of multiple events. For example, if we create a new subscription for a customer, we will receive events such as ‘customer.subscription.created’ and ‘payment_intent.succeeded’.
By registering a webhook endpoint in our Lexupay account, we enable Lexypay to automatically send event objects as part of a POST request to the registered webhook endpoint hosted by our application. Once the webhook endpoint receives the event, our application can execute backend actions (for example, calling a shipping provider API to schedule delivery after receiving the payment_intent.succeeded event).
Event Object
The event object we send to your webhook endpoint provides a snapshot of the changing object. It may include the ‘previous_attributes’ property that indicates changes, if any.
Example Event Payload
The following event shows a subscription update at the end of the trial period.

Event Object Structure
Review the event object structure to better understand the event and its underlying information.
Event Type
We receive events for all event types listened to by the webhook endpoint in our configuration. Use the received event type to determine what processing needs to be done by our application. The data.object corresponding to each event type varies.
Live and Test Models
You may receive event delivery requests in live and test modes to your endpoint. This can happen if you use one endpoint for both modes or if you are a Connect platform making test mode requests for a connected Standard mode live account. Use the livemode attribute to check if the object is in live or test mode, and determine the appropriate handling for that event.
API Version
‘api_version’ indicates the API version of the event and determines the structure of the ‘data.object’ included. Your endpoint receives events using the configured API version, which may differ from your account's default API version or the API version of all requests related to that event.
This attribute is determined by the destination endpoint, indicating that the same event can be sent to multiple endpoints using different API versions. If you are using Java, .NET, or Go client libraries, make sure to configure the endpoint API version to use the same API version embedded in the client. Otherwise, you may not be able to deserialize the event object.
When fetching event objects from the API, you cannot control the API version of the ‘data.object’ structure. Instead, retrieve that object from the corresponding API endpoint and use the ‘Lexupay-Version’ header to determine the API version.
API Request Event
When an event is created as a result of an API request, the request will appear as ‘request.id’. If you use ‘idempotency_key’ when making it, the request will be included as ‘request.idempotency_key’. Check this request hash when investigating what caused an event.
Data Objects and Previous Attributes
For ‘.updated’ events, the event payload includes ’data.previous_attributes’ that allows us to check what has changed in the Lexupay object. ‘previous_attributes’ in the ‘customer.subscription.updated’ event example above shows that the subscription had a previous value, ‘status: trialling’, among other changes. The ‘data.object’ object indicates the status as active, indicating that the subscription transitioned out of the trial period.
Oldest Delivery
Use pending_webhooks to determine how many configured endpoints for this event have not successfully responded to delivery. During the initial delivery, this value is 1 or higher because our endpoints have not yet successfully responded. If we fetch this event later, pending_webhooks will decrease to a minimum of 0 as each endpoint successfully responds. This is important for invoice.created events because failed deliveries can delay the finalization of the invoice.
Connected Account Event
Events from connected accounts sent to a Connect endpoint include the account. Use account to track which connected account has the object to ensure that our platform can process event data correctly.
Why Event Objects Are Created
This table explains various scenarios that trigger the creation of event objects.
| Source | Trigger |
|---|---|
| Dashboard | When you call the API to modify your Lexupay resources in the Lexupay Dashboard. |
| API | When user actions in your application or website result in API calls. |
| API | When you manually trigger an event with Lexupay CLI. |
| API | When you directly call the API using Lexupay CLI. |
Get Started
To start receiving webhook events in your app, create and register a webhook endpoint:
- Create a webhook endpoint handler to receive event data POST requests.
- Test your webhook endpoint handler locally using the Lexupay CLI.
- Register your endpoint within Lexupay using the Dashboard or the API.
- Secure your webhook endpoint.
You can register and create one endpoint to handle several different event types at the same time, or set up individual endpoints for specific events.
1. Create a Handler
Set up an HTTP or HTTPS endpoint function that can accept webhook requests with a POST method. If you’re still developing your endpoint function on your local machine, it can use HTTP. After it’s publicly accessible, your webhook endpoint function must use HTTPS.
Set up your endpoint function so that it:
- Handles POST requests with a JSON payload consisting of an event object.
- Quickly returns a successful status code (2xx) prior to any complex logic that could cause a timeout. For example, you must return a 200 response before updating a customer’s invoice as paid in your accounting system.
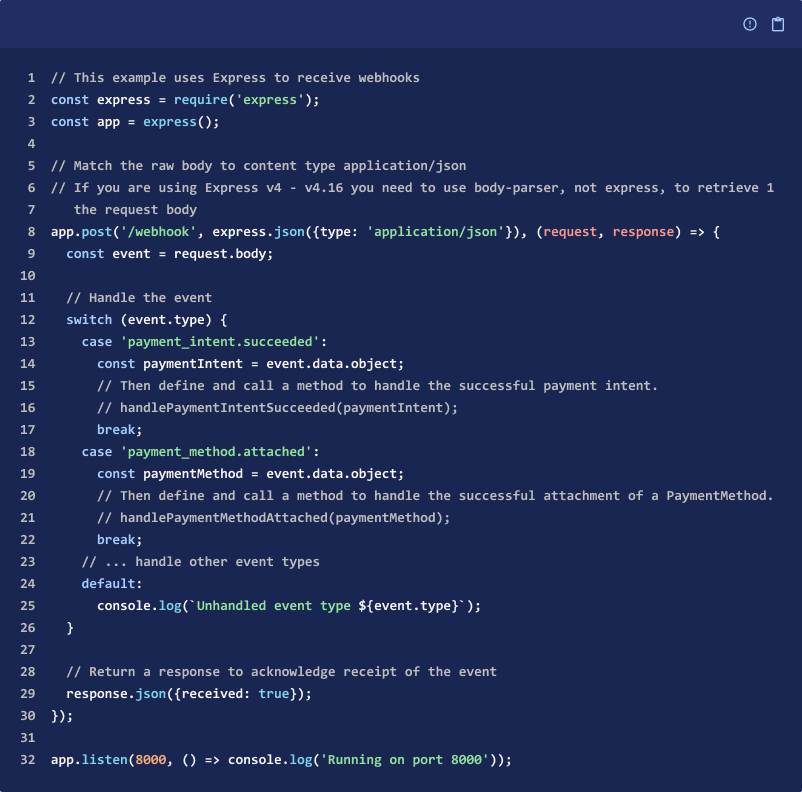
Example Endpoint
This code snippet is a webhook function configured to check that the event type was received, to handle the event, and return a 200 response.
2. Test Handler
Before you go-live with your webhook endpoint function, we recommend that you test your application integration. You can do so by configuring a local listener to send events to your local machine, and sending test events. You need to use the CLI to test.
Forward Events to a Local Endpoint
To forward events to your local endpoint, run the following command with the CLI to set up a local listener. The --forward-to flag sends all Lexupay events in test mode to your local webhook endpoint.

Useful configurations to help you test with your local listener include the following:
- To disable HTTPS certificate verification, use the --skip-verify optional flag.
- To forward only specific events, use the --events optional flag and pass in a comma-separated list of events.

-
To forward events to your local webhook endpoint from the public webhook endpoint that you already registered on Lexupay, use the --load-from-webhooks-api optional flag. It loads your registered endpoint, parses the path and its registered events, then appends the path to your local webhook endpoint in the --forward-to path.

-
To check webhook signatures, use the
{{WEBHOOK_SIGNING_SECRET}}from the initial output of the listen command.
Triggering Test Events
To send test events, trigger an event type that your webhook is subscribed to by manually creating an object in the Lexupay Dashboard. Alternatively, you can use the following command in either Lexupay Shell or CLI.
This example triggers a payment_intent.succeeded event:

3. Register Your Endpoint in Lexupay
After testing your webhook endpoint function, register the webhook endpoint’s accessible URL using the Webhooks section in the Developer Dashboard or the API so Lexupay knows where to deliver events. You can register up to 16 webhook endpoints with Lexupay. Registered webhook endpoints must be publicly accessible HTTPS URLs.
Webhook URL Format
The URL format to register a webhook endpoint is:

For example, if your domain is https://mycompanysite.com and the route to your webhook endpoint is @app.route('/lexupay_webhooks', methods=['POST']), specify https://mycompanysite.com/stripe_lexupay as the Endpoint URL.
Add a Webhook Endpoint
Lexupay supports two types of endpoints: Account and Connect. Create an endpoint for Account unless we've created a Connect application. Follow these steps to register the webhook endpoint in the Developers Dashboard. We can register up to 16 webhook endpoints in each Lexupay account.
- Open the Developers page by clicking Profile - select Developers.
- Select the Webhook tab.
- Click Add Endpoint.
- Add your webhook endpoint’s HTTPS URL in Endpoint URL.
- Add a description of the endpoint in Description.
- Next, select the Payload Format Version in the Choose Payload Format Version column.
- Select the type of event that we're currently receiving at our local webhook endpoint under Choose Event.
- Click Add Endpoint.
Register a webhook endpoint with the Lexupay API
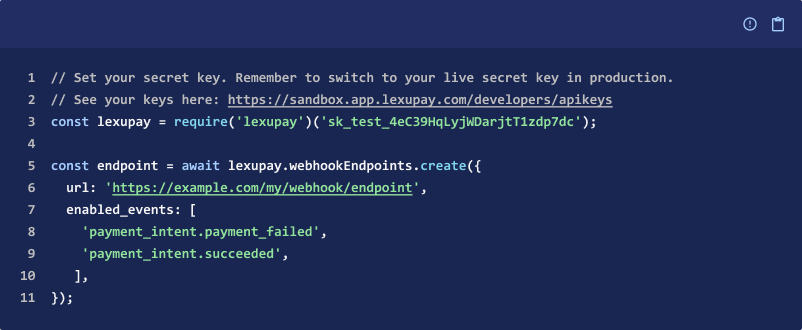
You can also programmatically create webhook endpoints.
To receive events from connected accounts, use the connect parameter.
The following example creates an endpoint that notifies you when charges succeed or fail.
4. Secure Your Endpoint
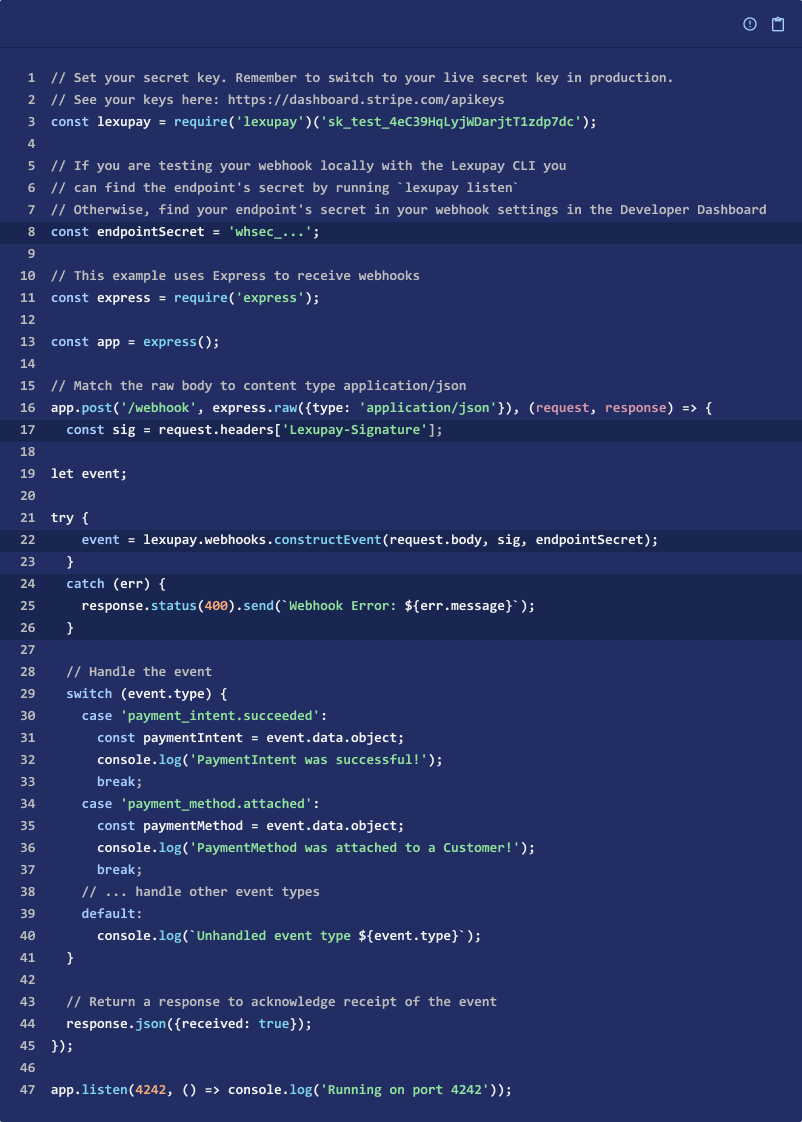
You need to secure your integration by making sure your handler verifies that all webhook requests are generated by Lexupay. You can verify webhook signatures using our official libraries or verify them manually.
Verify webhook signatures with official libraries
We recommend using our official libraries to verify signatures. You perform the verification by providing the event payload, the Lexupay-Signature header, and the endpoint’s secret. If verification fails, you get an error.
Debug Webhook Integrations
Multiple types of issues can occur when delivering events to your webhook endpoint:
- Lexupay might not be able to deliver an event to your webhook endpoint.
- Your webhook endpoint might have an SSL issue.
- Your network connectivity is intermittent.
- Your webhook endpoint isn’t receiving events that you expect to receive.
View Event Deliveries
To view event deliveries for a specific endpoint, select the webhook endpoint in the Webhooks tab.
To view all events that were triggered in your account, view the Events tab.
Fix HTTP Status Codes
When an event displays a status code of 200, it indicates successful delivery to the webhook endpoint. You might also receive a status code other than 200. View the table below for a list of common HTTP status codes and recommended solutions.
PENDING WEBHOOK STATUS | DESCRIPTION | FIX |
|---|---|---|
(Unable to connect) ERR | We're unable to establish a connection to the destination server. | Make sure that your host domain is publicly accessible to the internet. |
(302) ERR (or other 3xx status) | The destination server attempted to redirect the request to another location. We consider redirect responses to webhook requests as failures. | Set the webhook endpoint destination to the URL resolved by the redirect. |
(400) ERR (or other 4xx status) | The destination server can’t or won’t process the request. This might occur when the server detects an error (400), when the destination URL has access restrictions, (401, 403), or when the destination URL doesn’t exist (404). |
|
(500) ERR (or other 5xx status) | The destination server encountered an error while processing the request. | Review your application’s logs to understand why it’s returning a 500 error. |
(TLS error) ERR | We couldn’t establish a secure connection to the destination server. These errors are usually caused by an issue with the SSL/TLS certificate or an intermediate certificate in the destination server’s certificate chain. | Perform an SSL server test to find issues that might cause this error. |
(Timed out) ERR | The destination server took too long to respond to the webhook request. | Make sure you defer complex logic and return a successful response immediately in your webhook handling code. |
Event Delivery Behaviors
This section helps you understand different behaviors to expect regarding how Lexupay sends events to your webhook endpoint.
Retry Behavior
In live mode, Lexupay attempts to deliver a given event to your webhook endpoint for up to 3 days with an exponential back off. In the Events section of the Dashboard, you can view when the next retry will occur.
In test mode, Lexupay retries three times over a few hours. You can manually retry transmitting individual events to your webhook endpoint after this time using the Events section of the Dashboard. You can also query for missed events to reconcile the data over any time period.
The automatic retries still continue, even if you manually retry transmitting individual webhook events to a given endpoint and the attempt is successful.
If your endpoint has been disabled or deleted when Lexupay attempts a retry, future retries of that event are prevented. However, if you disable and then re-enable a webhook endpoint before Lexupay can retry, you can still expect to see future retry attempts.
Disable Behavior
In live and test mode, Lexupay attempts to notify you of a misconfigured endpoint by email if the endpoint hasn’t responded with a 2xx HTTP status code for multiple days in a row. The email also states when the endpoint will be automatically disabled.
API Versioning
The API version in your account settings when the event occurs dictates the API version, and therefore the structure of an Event object sent in a webhook. For example, if your account is set to an older API version, such as 2015-02-16, and you change the API version for a specific request with versioning, the Event object generated and sent to your endpoint is still based on the 2015-02-16 API version.
You can’t change Event objects after creation. For example, if you update a charge, the original charge event remains unchanged. This means that subsequent updates to your account’s API version don’t retroactively alter existing Event objects. Fetching older events by calling /v1/events using a newer API version also has no impact on the structure of the received events.
You can set test webhook endpoints to either your default API version or the latest API version. The Event sent to the webhook URL is structured for the endpoint’s specified version. You can also programmatically create endpoints with a specific api_version
Event Ordering
Lexupay doesn’t guarantee delivery of events in the order in which they’re generated. For example, creating a subscription might generate the following events:
- customer.subscription.created
- invoice.created
- invoice.paid
- charge.created (if there’s a charge)
Your endpoint shouldn’t expect delivery of these events in this order, and needs to handle delivery accordingly. You can also use the API to fetch any missing objects (for example, you can fetch the invoice, charge, and subscription objects using the information from invoice.paid if you happen to receive this event first).
Best Practices For Using Webhooks
Review these best practices to make sure your webhooks remain secure and function well with your integration.
Handle Duplicate Events
Webhook endpoints might occasionally receive the same event more than once. You can guard against duplicated event receipts by logging the event IDs you’ve processed, and then not processing already-logged events.
Only Listen to Event Types Your Integration Requires
Configure your webhook endpoints to receive only the types of events required by your integration. Listening for extra events (or all events) puts undue strain on your server and we don’t recommend it.
You can change the events that a webhook endpoint receives in the Dashboard or with the API.
Handle Events Asynchrounously
Configure your handler to process incoming events with an asynchronous queue. You might encounter scalability issues if you choose to process events synchronously. Any large spike in webhook deliveries (for example, during the beginning of the month when all subscriptions renew) might overwhelm your endpoint hosts.
Asynchronous queues allow you to process the concurrent events at a rate your system can support.
Exempt Webhook Route From CSRF Protection
If you’re using Rails, Django, or another web framework, your site might automatically check that every POST request contains a CSRF token. This is an important security feature that helps protect you and your users from cross-site request forgery attempts. However, this security measure might also prevent your site from processing legitimate events. If so, you might need to exempt the webhooks route from CSRF protection.

Receive Events with an HTTPS Server
If you use an HTTPS URL for your webhook endpoint, Lexupay validates that the connection to your server is secure before sending your webhook data. For this to work, your server must be correctly configured to support HTTPS with a valid server certificate. Live mode requires HTTPS URLs. Stripe webhooks don’t currently support TLS v1.3.
Roll Endpoint Signing Secrets Periodically
The secret used for verifying that events come from Stripe is modifiable in the Webhooks section of the Dashboard. For each endpoint, click Roll secret. You can choose to immediately expire the current secret or delay its expiration for up to 24 hours to allow yourself time to update the verification code on your server. During this time, multiple secrets are active for the endpoint. Stripe generates one signature per secret until expiration. To keep them safe, we recommend that you roll secrets periodically, or when you suspect a compromised secret.
Verify Events are Sent From Lexupay
Lexupay sends webhook events from a set list of IP addresses. Only trust events coming from these IP addresses.
Additionally, verify webhook signatures to confirm that received events are sent from Lexupay. Lexupay signs webhook events it sends to your endpoints by including a signature in each event’s Lexupay-Signature header. This allows you to verify that the events were sent by Stripe, not by a third party. You can verify signatures either using our official libraries, or verify manually using your own solution.
The following section describes how to verify webhook signatures:
- Retrieve your endpoint’s secret.
- Verify the signature.
Retrieving Your Endpoint’s Secret
Use the Webhooks section of the Dashboard. Select an endpoint that you want to obtain the secret for, and find the secret on the top right of the page.
Lexupay generates a unique secret key for each endpoint. If you use the same endpoint for both test and live API keys, the secret is different for each one. Additionally, if you use multiple endpoints, you must obtain a secret for each one you want to verify signatures on, and Lexupay starts to sign each webhook it sends to the endpoint.
Preventing Replay Attacks
A replay attack is when an attacker intercepts a valid payload and its signature, then re-transmits them. To mitigate such attacks, Lexupay includes a timestamp in the Lexupay-Signature header. Because this timestamp is part of the signed payload, it’s also verified by the signature, so an attacker can’t change the timestamp without invalidating the signature. If the signature is valid but the timestamp is too old, you can have your application reject the payload.
Our libraries have a default tolerance of 5 minutes between the timestamp and the current time. You can change this tolerance by providing an additional parameter when verifying signatures. Use Network Time Protocol (NTP) to make sure that your server’s clock is accurate and synchronizes with the time on Lexupay’s servers.
Lexupay generates the timestamp and signature each time we send an event to your endpoint. If Lexupay retries an event (for example, your endpoint previously replied with a non-2xx status code), then we generate a new signature and timestamp for the new delivery attempt.
Quickly Return a 2xx Response
Your endpoint must quickly return a successful status code (2xx) prior to any complex logic that could cause a timeout. For example, you must return a 200 response before updating a customer’s invoice as paid in your accounting system.
Updated 12 months ago